Friday, May 11, 2012

A Fitting Situation

So I’ve spent the past couple of months measuring, thinking, and, eventually, cutting a 327-sized hole in this li’l blue car. The best thing I’ve had going for me is that Carroll Shelby did something very similar almost 50 years ago, but he had a team, corporate backing, funding, and experience on his side – I’ve got a marker and a plasma cutter. Oh wait, and a tape measure. All three have been applied liberally.

But before I begin, let’s first go back to the beginning...

[Around mid-February 2012, in my garage, planning stuff:]
...Although not originally designed for a beefy V8 or a bulletproof 5-speed trans, the dimensions are surprisingly not too far from workable. The initial measurements are looking good; packing in the radiator, motor, and transmission will be tricky, but very doable. Line up tight, boys! It’s going to be a nuts-to-butts situation.

The foreseeable issues that I’m prepared to face are:

Front-to-rear weight distribution.
To offset the additional engine weight and to get the best possible handling, I need to position the motor as far back without blocking access to valve covers or spark plugs. I’d like it to look good, too – not pushed all up into the firewall.

Ground clearance.
Seems to be accommodating for a nice, low (but not too low) engine position to get that center of  gravity down.

Distributor.
Since I’m using a Chevy engine, the distributor is in the back of the motor instead of the front like a Ford/Tiger block. It's going to need some room.

Exhaust headers.
Measurements indicate a tight fit between the frame rails and the engine - like an inch or so on each side.

Throttle/Brake/Clutch pedals.
Uproot and relocate – the new transmission tunnel’s taking over your prime real estate.

Steering and front suspension.
The Rube Goldberg-looking, out-dated Alpine steering linkage won’t work with the new engine in the way. And I’m sure I can find something better than that ox yoke of a front crossmember.

Rear suspension.
The rear will need to be replaced as well. With some new springs and trac bars, I think the housing might be strong enough, but the diff gears and axles? The horsepowers and torques I’m expecting will tear them up. And quick.

It's now time to fire up the plasma cutter. So is it ‘measure twice, cut once’?...

[Present day:]
...More like ‘measure seventeen times, cut repeatedly'. After a few cardboard mockups, test fittings, and outright trickery, the engine is in the car, resting on temporary mounts. Here are some progression shots for you:

Stock Engine Hole
What it Takes to Fit a V8 in There
Ta-Da

Pre-Op
Per-Op
Post-Op


Not Yet
Getting There
That's the Ticket
Commenting on the foreseen issues above:

Weight Distro: The engine is in the best position it can be in. There should be just enough room for the radiator up front, and the gear shift position is very close to the stock location. The support bars even still fit in there - Cha-ching! I won’t know the F/R distro numbers until later, but (since this is such a light car) I can add weight to the rear if the numbers are crazy off. (I'm also using aluminum heads and intake manifold, saving about 100 pounds on the engine up front.)

Ground: The whole engine/trans assembly is just a couple of inches above the bottom of the frame (like it’s meant to be in there). A cowl/scoop is needed for hood clearance – I’m cool with that.
Clearance: Good!
Distributor: I needed to bust into the heater core compartment a little to make room for the distributor. The heater will still work, as will the vent controls, but I’ll need to make a trap door on inside the car to be able to install/access the heater core.
Minimal Modifications for Distributor
Exhaust: TBD. Room will need to be made, I just need to finalize my decision on which headers or exhaust manifolds to go with. Cut and weld, my friend, cut and weld.

Pedals: Still need to finalize and install them, but the mock ups are looking promising – brake and clutch will be shoved over to the left a little and the throttle will sit under the steering column.

Suspension: It’s still way too early to discuss anything other than speculation at this time, but it looks like C4 Corvette front and rear suspensions will fit in there nicely with a little narrowing (like an inch or two). I’ll crack those nuts after I have the exhaust and steering straight.

And some fun stories and lessons learned:
- With the limited-sized hood hole to work with, the drivetrain was not going in from above - I needed to jack the car up, slide the engine/trans under, lower the car down, and pull the engine up through the frame rails. With less than an 1/8” to spare on each side of the valve covers, it was quite harrowing.
- Find and mark the centerline of the car; always work from that centerline.
- Cut a little less than you think, then cut a little more if you need to.
- If not on a level surface, be sure the car is level (or in the final stance that you’re going for).

All-in-all, it's still looking promising without any 'unforeseen' issues. I plan on strengthening the frame a little and I'll be futzing with the associated pieces and parts, refitting what I need to as things pan out. Stay tuned...

Thursday, April 26, 2012

No Biggie, I was Already Planning on Lemonade

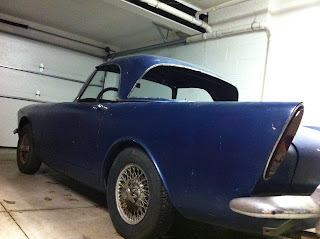
Continuing with our inspection of this Rootes’ roots, the teardown is complete and I’ll share a few noteworthy observations:

The Drivetrain
Going from front to rear, no parts are missing. There’s a nice rusty film in the engine compartment, indicating a prior, fairly significant, overheating.

The clutch doesn’t work and the transmission shifts as well as you’d expect it to without a working clutch. Driveshaft is decent and the rear diff is smooth with an appropriate amount of play in there. There’s a nice gouge in the pumpkin and a dent in the battery box - looks like a newer gas tank was installed as well and a 3-inch slash in the trunk floor – what the hell happened here? The driveshaft must’ve gotten loose and went on a rampage at some point.

The Front Clip
Despite the fact that the 50-year-old Alpine body seemed straight, there were some hints that something wasn’t entirely A.O.K. Where’s the hood prop rod supposed to go? What is this plumber’s putty? Why is that weld there? The evidence piled up and it looks like half the front clip was replaced at some point. About mid wheel well forward, there’s an overlap of sheet metal from underneath the wings and some dicey-looking cut marks along the wells from inside the engine compartment. All-in-all, a pretty good mating and good news for my project: I can breathe a little easier knowing I’m not gutting and cutting an otherwise pristine piece of automotive history. Some scars are good and this is still a very solid car.

The New Starter
Curiously enough, among the dishevelment under the hood, there sat a brand new starter gleaming like a diamond on a goat’s ass. “Car must run,” I presumed as I dropped a new battery in and connected up the wires. Lights? Check. Wipers? Check. Starter? Click. Starter!? Click. Starter...Nuthin’. Further troubleshooting was unproductive – either the engine was seized or the starter was.

Using some diagnostic methods obtained through careful observation of Wayne Carini’s Chasing Classic Cars, I skillfully put the transmission into second gear and rocked the car back and forth, watching the crank pulley move accordingly. “Engine’s not froze,” I surmised. Moving back to the starter…

I don’t know if starter theft was a big problem in 1962, but those Sunbeam engineers made sure nobody was getting away with removing this one easily or quietly. After f-ing around with it for a little while, I executively decided that it was time for curiosity to take the back seat and let progress drive. Afterall, I’m not going to reuse this motor and if anyone was going to buy it later on, there are other things to eyeball and ask; getting the motor to turn over while it’s still in the car would serve absolutely no purpose. So out it went.

With better access to the starter, I bypassed all solenoids and switches and connected jumpers directly to the starter motor - silence, again. For the fun of it, I swapped the Pos and Neg (could’ve been a polarization issue between car and starter?). Still negativo. No more speculation, the starter is dead.

Meanwhile, though, with the engine out and separated from the trans, I saw that the flywheel was chewed up a bit. Freshly chewed, I might add. As though the teeth on the starter didn’t mesh right and were gnawing at the base of the flywheel’s cogs. Sadly, I realized that this poor starter died fighting a battle that it could not win.

Now why am I prattling on about this stupid starter on an engine that I don’t ever need to see, hear, or otherwise know about running? What you should be asking ask is ‘why would someone go through the trouble of putting a new starter in (without any other evidence of any other recent work done) and then sell the car?’ Remember from the last post, when I said it could take some time for things to sink in, add up, connect? Well this is one of those moments.

So there I was, minding my own business, when all of a sudden a realization smacked me in the back of the head: Someone tried to pass off a lemon. A lemon, you say? Yep. Think about it: Someone went through the effort of putting a new starter in. It was either the wrong starter or not installed correctly, so it spun, but never meshed and kept grinding or stalling until it died, all-the-while making God-awful sounds without the engine even budging. The guy probably thought the engine was seized, the crank was severed, or the flywheel was a goner; he claims defeat on the project and sells the car.

Case closed!

We’ll get into making room for the 327 next time. So bring your grease pencils, grinders, and plasma cutters – it’s going to be a helluvalotta fun.

Friday, April 20, 2012

What Condition My Condition Is In

Checking in on the condition of the Alpine: the car tells more and more of its story the longer you listen, the deeper you look. Start by dicking around. You know, like a detective, a dick – ahhhh, nevermind.

Walk around the car, look at it from different angles. Does anything look odd? Are there strange lines, dents, dings, bubbles, waves, holes, colors? Does the car look right?

Without paperwork or known history to rely on, you have to piece together evidence to get your story going. It might even take a while to really get the full picture; one clue may spark a realization two weeks later - so keep an open mind and allow things to meld and convolve in your noggin.

This car was promoted as a rust-free, SoCal survivor and, from a preliminary inspection, nothing seemed off enough to doubt it:
-    Body straight; no weird, off angles; door gaps are even and true
-    Some expected dings and dents peppered throughout
-    No visible rust of consequence
-    Trunk bowed slightly
-    At least two repaints: black to green, green to blue
-    Interior showing proper signs of age and mileage


At the surface, things are legit. Some observations also seemed interesting enough to take mental note of:
-    1968 U.C. Riverside parking stickers on rear bumper
-    A new starter was installed
-    Tires seem very old but no flat spots or excess dryrot

Moving on… How much rust, Bondo, or other crap is lurking, waiting to be found? Grab a magnet and let’s see. Using a round magnet, you can roll it along the wheel arches, along rocker panels, and probe suspicious lumpy-bumpy areas:
-    Wheel arches: Good (feel up and along the inside of the arches as well - they’re good, too)
-    Rockers: Good
-    Rivets under paint on lower front quarters (patchwork?); will investigate further later
-    Bottoms of the door skins: Good
-    Random plucking at the side surfaces: Good

Again, looking OK. Now moving on to under the car, looking for rust, rot, repair, etc. You can tap around with a screwdriver handle to check for weak spots and use the business end for suspect areas:
-    Undercoating liberally applied throughout
-    Floors: Solid
-    Frame: Solid
-    Spiderwebs: Plentiful 

Consensus: At this point, it’s looking like a decent 50-year-old car. No major issues found so far; the biggest problem will probably be that trunk lid that went on a bender. The repaints would be a flag raiser if filler was found or if panels had different layers of paint underneath. We seem good to go on both counts. Also, the undercoating seems properly aged and worn to be believably original to the car.

Fast-forward a few weeks: the interior is out and I can check the floor pans from the inside. Some surface rust where moisture could hide out over the years, but no rot. The worst rust found so far is in the battery box behind the passenger seat: scales, not rot – so good again.


Some leaves and dust were found in channels and air ducts, but no significant gatherings of debris. Why would that matter? It suggests that this car spent most of its life in a dry climate or it was stored inside during its downtime. Also adding to this conjecture: that ol' sticker on the bumper and the condition of the tires, noted before.

All in all, the car is in great shape and we’ll see how many more issues are uncovered as we strip this sucka down. I'll also talk about that new starter and the state of the mechanicals next time...

Wednesday, February 15, 2012

Putting the Horses Before the Cart

Welcome.

This blog is dedicated to tracking the progress (and probable setbacks) of the complete and utter restoration of a 1962 Sunbeam Alpine. Well...more of a resto-mod.

To be honest, an Alpine wasn’t the first choice for this particular project but - in hindsight - it is perfect for what I’ve got planned [insert evil laughter here].

The idea of cramming a V8 into one of these LBCs (Little British Cars) sparked a few years ago during the restoration of my old ‘67 Triumph TR4A (see TR4ARestoration.BlogSpot.com). I didn’t want to veer too far from stock on that build, but V8 thoughts remained, haunting.

As many men throughout history have pondered, I too had thought How absurdly large of an engine can I put into a comically small chassis? Although the possibilities seemed endless, the amount of class and downright appropriateness whittled my choices to a mere handful:
         -   It would have to be a small block for size & weight considerations
         -   It would have to be common enough to make sense
         -   It would have to be period-correct to be ‘believable’

The Buick-Rover 215 Aluminum job seemed like a nice fit, but not really common enough to have adequate performance parts available. The Chevy 350 seemed too commonplace. A Ford 289/302 was a safe bet, but I wanted something more. I couldn’t put my finger on it, though. A certain something. Something that made a statement, something that piqued curiosity, something that reeked of performance and captured the essence of the 60’s. A Corvette motor? That was it. A Chevy 327 is so much more elegant than the ubiquitous 350. And performance to boot – 365 horses from a stock 327 in 1965, SOLD!

And ‘sold’ it was – I found nice short block on eBay and I had my engine. A 1965 Chevy 327, which I turned into a reproduction/modified L-76 that should pump out around 440 HP (I went straight past ludicrous and into plaid). I’ll dedicate a post solely to this engine and “Project HFS” later.

This was July 2011. I had my horses, but no cart to speak of.

Fast-forward to December 2011: I had mentioned the urge to use a TR4/4A as the cage for this mouse motor but, alas, I was having a hard time finding the right one. Also, the more I thought about the TR4, the less convinced I was that it was the right choice. It’s a strong car, but I worried about all the flex it had without strapping on an additional 300+ horses. That body-on-frame technology just wouldn’t do.

Enter the Sunbeam. I had originally ruled out the Sunbeam as a choice, based more on ignorance than anything else. I knew Tigers. I knew they had V8s. I also knew my budget – and Tigers were not in it. I knew of Alpines, but I didn’t know much. I kinda knew the Tiger was a derivative of the Alpine, but didn’t realize how similar they truly were. I didn’t really pay much attention to them until I saw how inexpensive they were. So I did some research. Parts seemed readily available, they’re lighter than the Triumphs, they’re unibody cars, and Bingo was his name-oh. The skies cleared and my mind was made up: the Sunbeam Alpine.

As luck would have it, I found a rust-free ’62 in SoCal on eBay the same day my revelation came to me and I bought it.

My 1962 Sunbeam Series II Alpine arrived on December 20, 2011.
 
And so the journey begins...